Showing posts with label DIY. Show all posts

CUBBY DRAWERS- THURSDAY'S THRIFT STORE FIND MAKEOVER


I am obsessed with cubby drawer storage cabinets. I have to have them!
 They are my one weakness when I am out and about thrift shopping!
Seriously, would you pass these up?

  Truth be told, I almost...OK, I NEVER find cubby cabinets looking
like these when I am thrift shopping.


 This is the state I normally find my cubby treasures.
Not so pretty...actually...pretty shabby.


But...that's all right with me!
 What a difference a little imagination and creativity can do to
transform these thrift store finds in to one-of-a-kind masterpieces!

My inspiration for this cabinet makeover was a plethora of small
drawer pulls that I had accumulated and a desire to try decoupaging with scrapbook paper rather than paint each drawer individually.


The inspiration for this cabinet is pretty obvious. If you are like me,
Judy Blume was the go-to author for girls coming of age in the late 70's.


 I had quite an emotional response to this project. 
I loved these books as a young girl. I had many of these very same books.  
I went through boxes that had been packed for many years 
and found my Judy Blume books.


You can see that these books were loved. 
 I considered the characters in Judy Blumes books my best friends.


This particular cubby drawer makeover is my favorite.

I added wheels to give the piece a more industrial feel and large
stainless steel cup hooks for the drawer pulls.
The cup hooks as drawer pulls give an almost unobstructed view
of the book covers while still allowing access to each drawer.


Both cubby drawer cabinets turned out better than I could have hoped.


The best part of making over thrift shop finds is that it doesn't
have to cost a lot of money. Both projects were literally done
with things I already had in my "stash" of craft room goodies.


Don't just decorate-
De-create your life and home!


 Thanks for stopping by to take a look at what I create
when I am left to my imagination!

Come back soon!

Pam


ST. PATRICK'S DAY MARQUEE- "Kiss me I'm Irish"


I wanted to make something a little bit different
 this year for St. Patrick's day to display in our home.


I would say that this project qualifies.


I have wanted to make a marquee sign for what seems
like forever. And being who I am, and never having made
 a marquee sign before, thought I would jump right in and give it a try.


"Kiss me I'm Irish", popped in to my head.
 So, naturally, a pair of lips seemed like
a good idea to make. 


There are a lot of great tutorials on Pinterest that will guide you
 step-by-step.  Though I had a pretty good idea how to create
 my marquee sign, I did find the website mylove2create.com 
to be incredibly helpful!
  I chose to use an inexpensive sheet of foam core. 
 I drew a pair of lips and cut them out with a box cutter.


I wanted the marquee sign(or lips if you will) to be green
and glittery in honor of St. Patrick's day.
I was able to purchase a set of 24 led battery operated lights
from my local Michaels craft store.
 
 
.
The sides of the marquee sign was constructed from
glitter card stock that was cut in to 3" strips and hot glued around
the entire perimeter.


I have to admit it- I think it came out fabulous!
And it looks amazing on my mantle.


I truly believe that left to my imagination, I can make anything
and so can you!
 
Thanks for stopping by to take a look!
 
Come back soon-
 
Pam


Wool felt Valentine Fortune Cookies-


HAPPY VALENTINE'S DAY


These wool felt fortune cookies are such a simple project to do with your kids.
 
What I find especially wonderful about these little cuties,
 (the cookies not my kids-though they are a bunch of cuties too),
is that they can be created for any special occasion!
 
Left 2 the imagination- Anything is possible!
 
Here let me show you-
 
I am a wool felt artist, so I went with what I have in my studio
grabbing red, raspberry and white wool felt for
these valentine fortune cookies.


I  decided on a 5" circle template(I traced a DVD).
This will make approximately a 3" cookie.
 
I traced and cut out the number of circles I would need.
 
You will also need for this project,
pipe cleaners
glue stick 
 fortunes of your choice. 


After the circles are cut and the fortunes
are printed and cut to size,
you'll want to take your pipe cleaners and trim
them to approximately 4 1/2" long.
 
Take a pipe cleaner and glue it
to the middle of the circle.
 
The pipe cleaner is what holds
the fortune cookies shape.


Good so far? Pretty simple and straightforward!
 
Take a paper fortune and lay it down
on the top half of your circle.
 
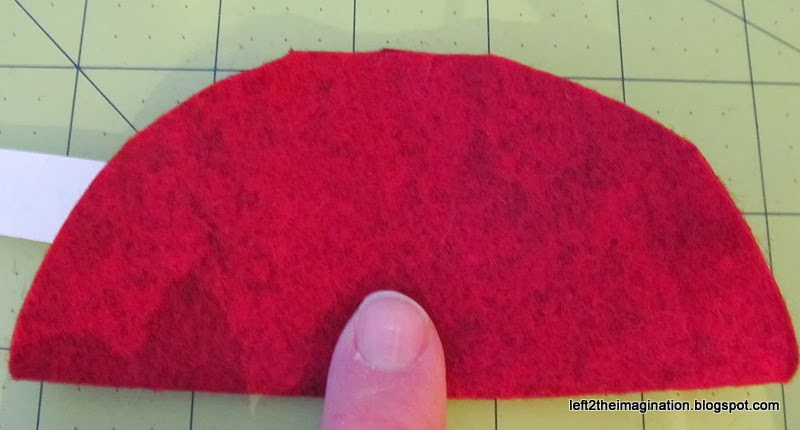
 Fold the circle in half
 over the pipe cleaner that you glued
to the middle of the circle.


With two hands, and your thumbs in the center of the circle,
 bend the ends of the circle down.
 
Bring the ends of the circle towards each other
while pinching the center.


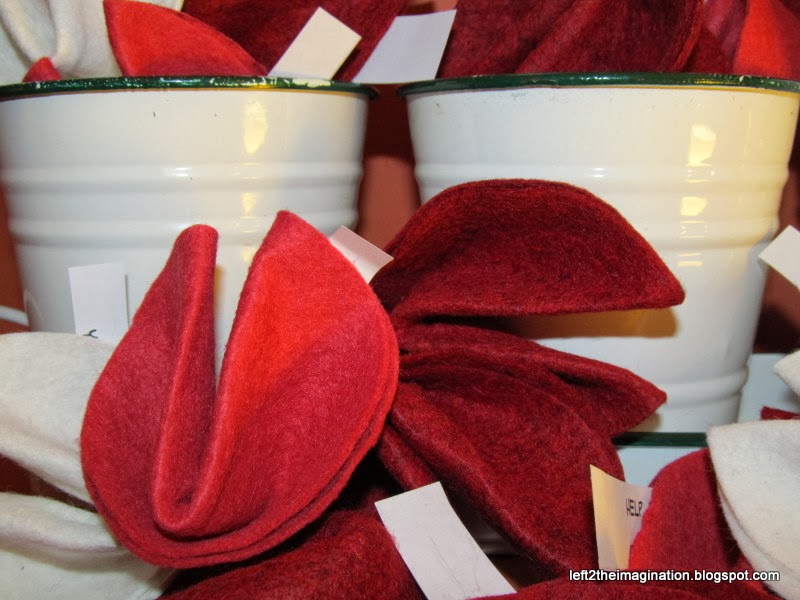
You will be amazed how easily the shape
of the fortune cookie is made and how
well the pipe cleaner holds the shape!
 
(Feel free to give your self a round of applause, I did!)


That's absolutely all there is to this project!
 
Make as many as you need!


I will say that it can become addictive to make these cuties.


I don't think it's possible to have too many!


I would love for you to let me know
if you try this at home!
 
See you again soon!
 
 
-Pam