Showing posts with label wool felt. Show all posts

VALENTINE DAY GIFT IDEAS


Over the last couple of days, between snow storms
in Middleboro, Ma., I got an itch to be creative and
make something fun and fresh for valentine's day.
 
On the left is a pincushion or make-do, it's up to you.
While on the right I created a wool penny rug style cone
filled with handcrafted mini pinwheels.


The pincushion was inspired by a vintage valentine. 
Nothing speaks to my creative spirit more than
a little valentine diddy that is all about sewing!


Can you guess what I used to create
the arrow going straight through the heart?
 
 
The arrow is made from metal screening
and silver pipe cleaners!
I know!!!!
 
 
Here you see the tiny embellishments I added
to the bed spring. They are tied on with silver tinsel.


While the pinwheel cone was made to stand up inside a bed spring,
 you see here, it can also be hung from a hook.
Either way, I think it's fun and full of whimsy!


The pinwheel cone displayed inside
the bed spring.


 I found this adorable little boy image on thegraphicsfairy.com.
He is printed on cardstock and outlined with silver glitter.
The heart was cut from glitter vinyl and silver
tinsel has been hand sewn around the perimeter of the heart.


Pinterest.com has a plethora of websites that offer
free mini pinwheel templates for you to use.  
I chose two different styles and used a mix of glittery cardstock.
I just happened to already have(if you can believe it)
the brads used to secure the pinwheel petals.
I don't think I could have wished for anything more appropriate!


The best thing about creating something yourself,
is that it doesn't just have to be for a special occassion.
With your imagination, it can be made for every day!


Happy Valentine's day!
 
Thanks for stopping by and taking a look!
 
Come back soon-
 
Pam


Wool felt Valentine Fortune Cookies-


HAPPY VALENTINE'S DAY


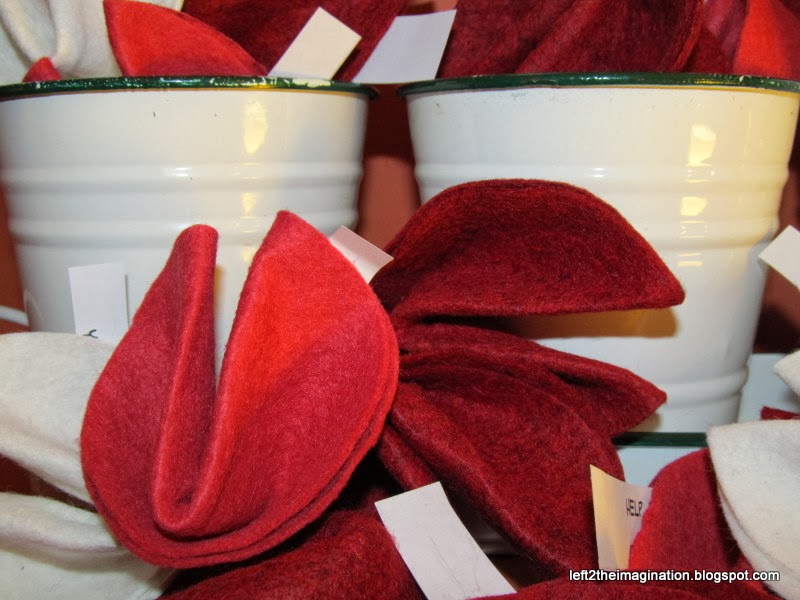
These wool felt fortune cookies are such a simple project to do with your kids.
 
What I find especially wonderful about these little cuties,
 (the cookies not my kids-though they are a bunch of cuties too),
is that they can be created for any special occasion!
 
Left 2 the imagination- Anything is possible!
 
Here let me show you-
 
I am a wool felt artist, so I went with what I have in my studio
grabbing red, raspberry and white wool felt for
these valentine fortune cookies.


I  decided on a 5" circle template(I traced a DVD).
This will make approximately a 3" cookie.
 
I traced and cut out the number of circles I would need.
 
You will also need for this project,
pipe cleaners
glue stick 
 fortunes of your choice. 


After the circles are cut and the fortunes
are printed and cut to size,
you'll want to take your pipe cleaners and trim
them to approximately 4 1/2" long.
 
Take a pipe cleaner and glue it
to the middle of the circle.
 
The pipe cleaner is what holds
the fortune cookies shape.


Good so far? Pretty simple and straightforward!
 
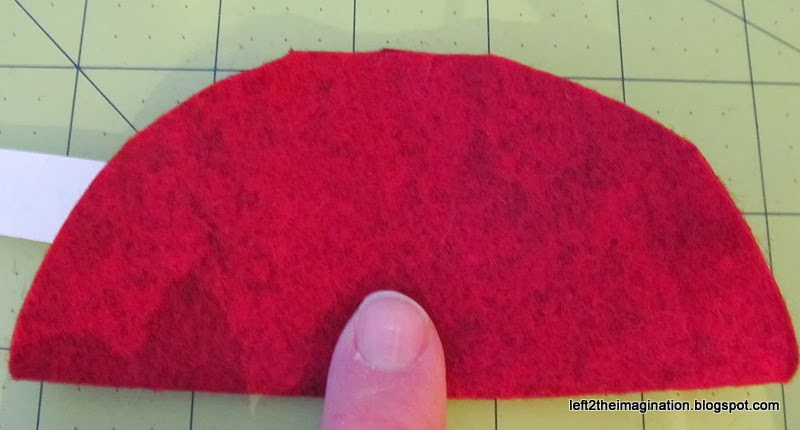
Take a paper fortune and lay it down
on the top half of your circle.
 
 Fold the circle in half
 over the pipe cleaner that you glued
to the middle of the circle.


With two hands, and your thumbs in the center of the circle,
 bend the ends of the circle down.
 
Bring the ends of the circle towards each other
while pinching the center.


You will be amazed how easily the shape
of the fortune cookie is made and how
well the pipe cleaner holds the shape!
 
(Feel free to give your self a round of applause, I did!)


That's absolutely all there is to this project!
 
Make as many as you need!


I will say that it can become addictive to make these cuties.


I don't think it's possible to have too many!


I would love for you to let me know
if you try this at home!
 
See you again soon!
 
 
-Pam

WELCOME TO MY WORLD-


This is where the creative magic happens! My studio, my sanctuary, the heart of my home. Well, actually my studio resides in the heart of our home, the kitchen! My studio is in the breakfast banquet of our kitchen. Yup all 6x11 feet of it is all mine! Don't laugh, I love it- now!


It was a bit of an adjustment at first. You can see that there is virtually no wall space just windows. The 3rd wall is a cut out that opens in to our sun room. Also the entire perimeter of the space has built-in seating. Taking them out is not an option, and neither is having a conventional desk or furniture that actually sits on the floor!


Now, something you should know about me is that if it's free, it's for me! And that's exactly what the cubby holders that house my fabric stash cost me! I found it on the side of the road! At the time, it was one solid piece. My wonderful husband cut it in half for me so that I could put it on the built in benches! Viola!


Tons of storage, perfect for my fabric stash and the total cost for me, nothing! I will go as far as to say that 85% of the fabric you see in the cubbies were thrift store purchases that I brought home and deconstructed! How's that for being "green".


The barrister bookcase at the end of my studio space is the only piece of furniture that actually sits on the floor! It was free too! A friend bought it for me at a yard sale. It sat in our shed outside for about 3 years before we moved it to our cellar when our home was finished being built! It sat there for almost 2 years before I had a light bulb moment and brought it upstairs!


I couldn't believe it had taken me so long to use it! It was a perfect fit! It looks amazing filled with larger pieces of my wool fabric and as a display for some of my most personal and treasured collectibles!


The large cubby hole drawer piece was a gift from my Mom!  She is thriftier than I am and has taught me everything I know! The piece cost less than $30.00 and is another one of my prized possessions!


It holds all of my Perle cotton threads, ribbons, glues, needles, the list goes on and on... As does the assortment of items I use to decorate my office.  My studio inspires me!

             
 I am a work in progress, much like the things I create, the home I make for my  family and the way I choose to live my life!