Wool felt Valentine Fortune Cookies-


HAPPY VALENTINE'S DAY


These wool felt fortune cookies are such a simple project to do with your kids.
 
What I find especially wonderful about these little cuties,
 (the cookies not my kids-though they are a bunch of cuties too),
is that they can be created for any special occasion!
 
Left 2 the imagination- Anything is possible!
 
Here let me show you-
 
I am a wool felt artist, so I went with what I have in my studio
grabbing red, raspberry and white wool felt for
these valentine fortune cookies.


I  decided on a 5" circle template(I traced a DVD).
This will make approximately a 3" cookie.
 
I traced and cut out the number of circles I would need.
 
You will also need for this project,
pipe cleaners
glue stick 
 fortunes of your choice. 


After the circles are cut and the fortunes
are printed and cut to size,
you'll want to take your pipe cleaners and trim
them to approximately 4 1/2" long.
 
Take a pipe cleaner and glue it
to the middle of the circle.
 
The pipe cleaner is what holds
the fortune cookies shape.


Good so far? Pretty simple and straightforward!
 
Take a paper fortune and lay it down
on the top half of your circle.
 
 Fold the circle in half
 over the pipe cleaner that you glued
to the middle of the circle.


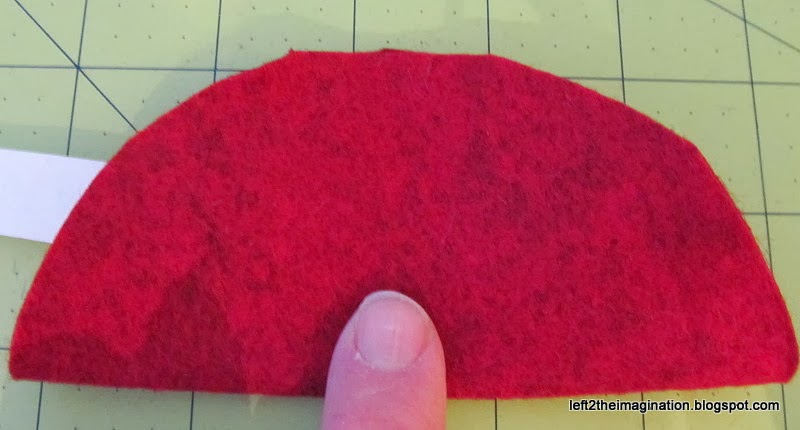
With two hands, and your thumbs in the center of the circle,
 bend the ends of the circle down.
 
Bring the ends of the circle towards each other
while pinching the center.


You will be amazed how easily the shape
of the fortune cookie is made and how
well the pipe cleaner holds the shape!
 
(Feel free to give your self a round of applause, I did!)


That's absolutely all there is to this project!
 
Make as many as you need!


I will say that it can become addictive to make these cuties.


I don't think it's possible to have too many!


I would love for you to let me know
if you try this at home!
 
See you again soon!
 
 
-Pam

Cupboard Makeover- Postcards, Paper, and Pottery


I purchased this vintage built-in cupboard at one of my favorite second hand shops for the thrifty price of only...$40.00!
I had big eyes and big ideas for this cupboard! 
It's only taken me 5 years to do something with it!
 
 
Uninspiring to say the least-
 Take a closer look, I don't mind.
I think I was going for a tone on tone, shabby chic look.
 I'm certain we can all agree I hit it out of the park on shabby, but missed completely in the chic department.


Here is the AFTER!
 What a difference!


 I found an amazing postcard wrapping paper that I didn't even know I owned.
The postcard wrapping paper was my inspiration for the vintage look
 I would create in my cupboard.


I took the original paper to Staples and made lots of color copies
(any good crafter will tell you to never use the original, save it for future projects!)
 
 
I  glued the color copies to poster board and adhered them to the walls of the cupboard with Command strip removable tape.
 I liked the idea of being able to remove the postcard paper
should I ever want to change the look of the cupboard in the future!


  I wanted to create a book page wreath, to add to the vintage look of my cupboard.
 I've always wanted to make one and now seemed like the perfect time.
 
There is no end to the creative people on Pinterest that offer amazing tutorials.
My thanks goes out to the wreath tutorial on Janinascasa.blogspot.com!
I love how this piece turned out!


Now came time to learn a little origami!
 
Back to Pinterest where I saw these amazing 8-pointed stars.
For great directions on how to make these origami stars try homebylinn.blogspot.com.
Her photo tutorial needed no further explanation! Thank you Linn!


Next came a chance to make this cute little origami flower I saw on Pinterest!
I loved the easy to follow tutorial that I found on fancypantswedding.com.
 
I have to say that origami isn't as hard as I once thought!


The star, tissue paper flowers and origami flower were supposed to make up a bouquet  providing another vintage layer to the cupboard makeover.
It seemed appropriate considering the cupboard was filled with vases.
 
The origami star and flowers however decided they preferred to stand each on their own.
Who am I to argue?
Things happen for a reason!
 
 
I would be remiss if I didn't thank my Mom, my best friend.
 
 Several of the treasures in the cupboard, the rolled paper "P"
as well as the scrabble tile names were made with love by her as gifts to me
and my 3 sons! 


After all these pieces were made
and other treasures were gathered from around my home it was time to pull it all together!
 
Take a look-


There you have it!
My cupboard makeover.
I think it very nicely tells the story...of Postcards, Paper and Pottery!
 
 
Come back soon!
 
Pam