HALLOWEEN DECOR- HANDMADE FOR THE HOME

 
Halloween has fast become one of those holidays that isn't
just about the trick or treating, but has more to do with all the ways
you can decorate(or as I like to say, "dec-create") your home!
 
In my front hall hangs one of my most favorite handcrafted pieces,
a happy Halloween wool banner!
While easy to make-
 it also makes a great statement!


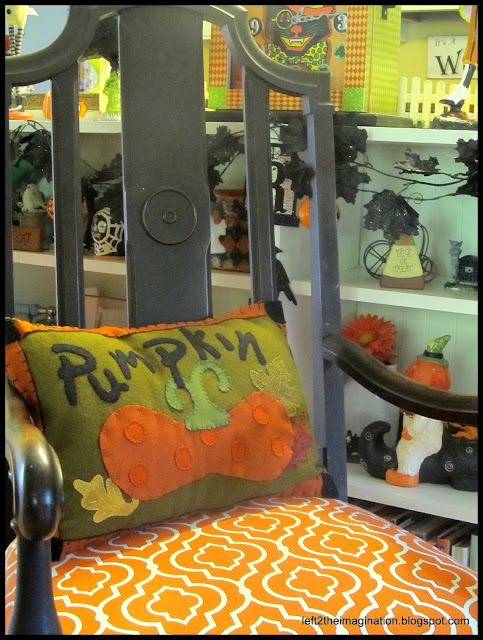
Here I designed and created a cute little pumpkin pillow.
This wool pillow is fun and while it was made
for the Halloween season, it would work in
your home décor right through Thanksgiving!


 Another great handcrafted addition to our Halloween décor is this table runner.


This year I branched out of my comfort zone
of working with wool and sewing to try something new!
 
I created this vintage-inspired Halloween clock!
The clock began its life as a simple and non-descript country style clock.
(Before and after photos can be seen at the end of this post)
I happen to think it turned out phenomenal!
This vignette is one of my favorites and also includes another
one of my signature wool banners!


One of the things I most enjoy about being creative and using
my imagination, is that there really isn't anything you can't create!
I have always loved the look and lure of the Ouija board.  I immediately
thought that I should make one from wool, of course!
It can be used as either a wall hanging or table scape!
What do you think?


Now I think you will agree,(that is if you are over the age of 40),
that no Halloween is complete until you have watched
Charlie Brown and the Great Pumpkin on tv.
Here is my homage to Charlie Brown and the gang!
The spider web is another great Halloween home décor item
that I created with wool!


Well that's a little sneak peak in to how we handcraft the home for Halloween!
I believe that when you take something you have made with your own two hands and a bit of imagination, you have an opportunity to "dec-create" and design something really spectacular for your home!


Don't forget to take a look below at the before and after photos
of the vintage inspired Halloween clock.
 
 
And...if you like what you see, most of what I have created 
will be for sale soon, along with a plethora of other
figments from my imagination, in my new Etsy store!
Yes, after a lot of hemming and hawing,
I am ready to take my work to the next level!
  
Come back soon!
 
-Pam


A Burlap Tassel- There is beauty in simplicity


I love tassels. 
They look great anywhere, are easy to make and well...
...they are beautiful!


I made this tassel from several printed burlap ribbons.
My favorite one is the ruler stamped ribbon.
  
 
  Here's how simple it is to make a tassel! 

As I stated, I chose burlap ribbons, 4 different ones in varying widths. 
I used a jute twine for the wrapping around of the tassel and the hanging loops.
 I chose a 6" clipboard to wrap the ribbons around.
 It's sturdy and won't bend. 

 That's about all you need!
 
 See- so simple.


I took several strands of the jute and taped them to the clipboard.
I like a full and chubby tassel, so I wound the ribbon

approximately 6x's around the clipboard.


When I finished winding the ribbons, I took the ends of the twine
 that I had taped down to the clipboard and tied a very tight knot.
 To form the "head" of the tassel, I firmly wrapped the twine
 about 1" down from the top and then tied it off.


 Once the top of the tassel is knotted
and wrapped, there is only one last thing to do.
 
Take a pair of scissors and cut through
the bottom loops of your tassel.


 Oh and give it a good shake!
Have I mentioned that I love tassels!
        
    
 This is only one of many materials to use in making a tassel.
What would you use?
 
 
Thanks for stopping by and taking a look!
I truly appreciate it!
 
Come back soon-
 
Pam

ST. PATRICK'S DAY MARQUEE- "Kiss me I'm Irish"


I wanted to make something a little bit different
 this year for St. Patrick's day to display in our home.


I would say that this project qualifies.


I have wanted to make a marquee sign for what seems
like forever. And being who I am, and never having made
 a marquee sign before, thought I would jump right in and give it a try.


"Kiss me I'm Irish", popped in to my head.
 So, naturally, a pair of lips seemed like
a good idea to make. 


There are a lot of great tutorials on Pinterest that will guide you
 step-by-step.  Though I had a pretty good idea how to create
 my marquee sign, I did find the website mylove2create.com 
to be incredibly helpful!
  I chose to use an inexpensive sheet of foam core. 
 I drew a pair of lips and cut them out with a box cutter.


I wanted the marquee sign(or lips if you will) to be green
and glittery in honor of St. Patrick's day.
I was able to purchase a set of 24 led battery operated lights
from my local Michaels craft store.
 
 
.
The sides of the marquee sign was constructed from
glitter card stock that was cut in to 3" strips and hot glued around
the entire perimeter.


I have to admit it- I think it came out fabulous!
And it looks amazing on my mantle.


I truly believe that left to my imagination, I can make anything
and so can you!
 
Thanks for stopping by to take a look!
 
Come back soon-
 
Pam